Does anyone remember the commercial for Rice Crispy Treats when the woman would throw flour on her face in the kitchen to make it look like she worked so hard to make them and then tell her family "Go ahead......eat them. I'll make more."? That's pretty much how I feel about these bags.
The finished bag looks like it was difficult to make, but really it's super easy!
A few of my girlfriends who are learning to sew are a bit intimidated by zippers.
One dear friend of mine actually used crazy glue to attach a zipper.
(Don't worry...your secret is safe with me!:)
Well here is a project that makes sewing in a zipper Easy Peasy!
By using a zipper that is larger than the bag itself, it makes this bag totally stress free
and there is no wrestling with the zipper.
This is such a breeze to do, you can even change the dimensions for any size bag, larger or smaller.
The finished size of this bag is 7 1/2" by 4 1/2".
So are you ready to make a cute bag?
 |
For this size bag you will need a zipper that is at least 12" long.
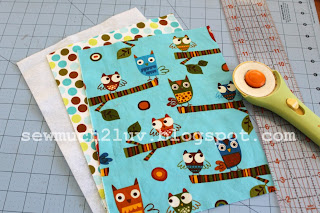
Cut 1 each of your main fabric, your lining fabric and fusible fleece into 8 1/2" by 11" rectangles. If you are using an obvious directional fabric like these owls, make sure to cut your fabric accordingly. |
 |
| Next, iron your fusible fleece to the wrong side of your lining fabric. |
 |
| Layer your fabrics and make a cut at 4 1/2" from the bottom. You will have (2) pieces 4 1/2" by 8 1/2" and (2) pieces 6 1/2" by 8 1/2". |
 |
| You can see by the photo that I am using a zipper that is quite a bit larger than the 8 1/2" fabric pieces. You can use any size you have laying around as long as it's larger that the bag you are making. Open your zipper and make sure it is face down on top of the 6 1/2" main fabric with the zipper pull to the left. |
 |
| Attach your zipper foot to your sewing machine. Sandwich the zipper between the main fabric and the lining fabric, right sides together. You can certainly use pins here to keep your pieces in place. |
 |
| Using a pen or marker, make a mark where the fabric ends on both halves of the zipper. This will be a reference point. |
 |
| Line up your 4 1/2" main fabric at the mark your made on the zipper so that both sides will line up and sandwich that side of the zipper the same way that you did the other with main fabric and lining fabric having right sides together. |
 |
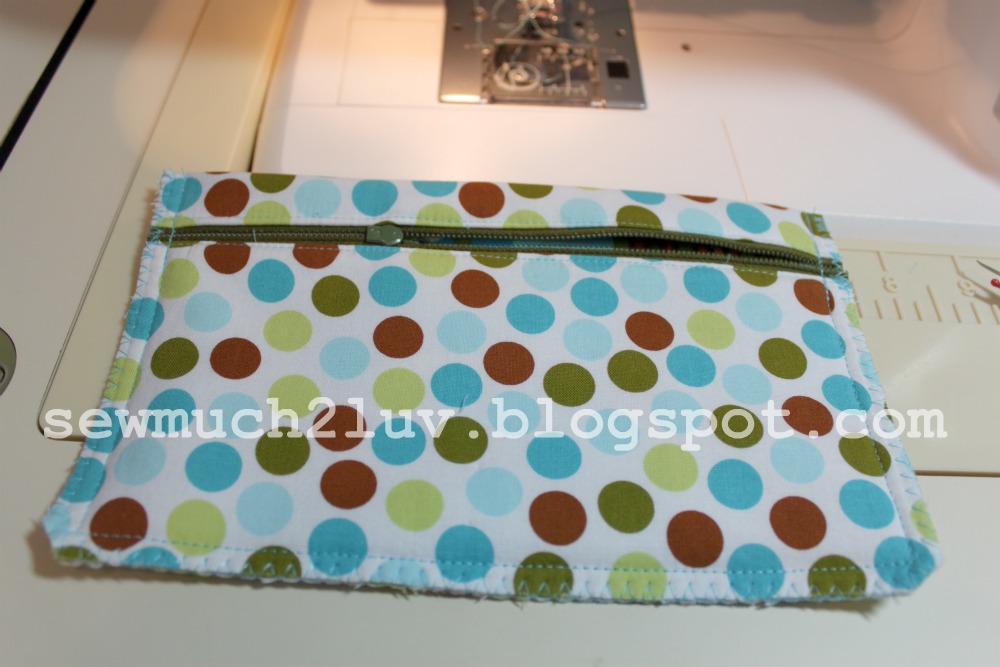
| This is what it should look like. Double check that you have the zipper face down at this point. ( Just the other day I ended up having to use the trusty seam ripper to re-do a bag because the zipper was wrong side up. ) |
 |
| Flip both pieces around so that wrong sides are together now and press from both sides being careful not to iron the zipper itself. You are trying to make sure that the fabric is away from the zipper teeth. |
 |
| Still using your zipper foot, top stitch close to the edge of the fabric to insure that it won't get caught in the zipper when you open and close the bag later. |
 |
| This is the time you would add any ribbons, ruffles, or appliques to the bottom section of the bag. Because this fabric has so much going on I chose not to add anything to distract from the owlies. |
 |
| Open the zipper at least 1/2 way or more to enable you to flip the bag right side out after you sew the edges together. With the main fabric (right sides facing) pin the bag. |
 |
| Using a 1/2" seam allowance stitch the 3 sides together making sure to stitch slowly through the zipper, using the forward and reverse stitching for re-enforcement. Dont' be afraid to sew through the zipper. Just go slowly and it works great. |
 |
| Now you are ready to cut off the extra length of the zipper on both sides of the bag. |
 |
| Trim your seam allowances and zig zag or overlock all 3 edges. |
 |
Turn the bag right side out and carefully push out the corners. Sit back and admire your work!
Easy right? So go ahead, give one to a friend.....you can make more :) |


Okay - you made that look very easy and I think I'm going to give it a try one of these days! Thanks for teaching!
ReplyDeleteSew Much 2 Luv: Don'T Fear The Zipper...Bag Tutorial :) >>>>> Download Now
Delete>>>>> Download Full
Sew Much 2 Luv: Don'T Fear The Zipper...Bag Tutorial :) >>>>> Download LINK
>>>>> Download Now
Sew Much 2 Luv: Don'T Fear The Zipper...Bag Tutorial :) >>>>> Download Full
>>>>> Download LINK F8
Yeah!! I've been begging (okay more like whining) for this tute!!!
ReplyDeleteI was not the glue person....just sayin......
great, now 'don't fear the reaper' is gonna be stuck in my head all. dang. day.
ReplyDeleteToo cute :-)! Thank you so much for the tutorial. You know me and zippers...I am so way going to try this!
ReplyDeleteToo cute! Thanks for the inspiration and tutorial all in one! :)
ReplyDeleteI have a ton of colorful zippers from Zipit on Etsy that I can't wait to use for some of these!! Thanks Karen awesome tut!
ReplyDeleteEtsy has a fun zipper store??? later, I gotta look!
ReplyDeleteA great tutorial! Thanks!
ReplyDeleteI do the FEAR the zipper, but you make it look easy!! Thank you so much for showing off on my blog!
ReplyDeletewww.ladybirdln.com
FUN!! Thanks for sharing!
ReplyDeleteI have zero sewing skills but I love these precious pouches! Thanks for the easy to understand instructions - just in case I try to tackle it! :)
ReplyDeletei too am very intimidated with zippers. i am anxious to try it with your tutorial.
ReplyDeleteThank you Karen,I no longer fear the zipper!
ReplyDeleteMade up a few of these myself just this morning & they are easy peasy :)
Grazie!!!! Bellissimo e utilissimo tutorial!!!!
ReplyDeleteThese are sooo cute. I don't know how to sew but I will definetly give a try . Thank you for the tutorial.
ReplyDeleteI can't sew worth beans, but i'd like to try. How do I puchase a zipper foot? I have a very basic beginner sewing machine, do you think it will be able to handle a zipper? I'd be so thankful for any help I can get!
ReplyDeleteCute! Thanks for sharing this!
ReplyDelete(Saw you featured on Ladybird Ln today.)
Hi Aubrey! You can look online for a zipper foot for your model sewing machine or check out a sewing machine shop in your area to see if they have the one you need. I'm pretty sure all sewing machines have the option to add a zipper foot. Thanks so much for stopping by and I'm happy to share what I've learned over the years anytime you have questions! Have a great day!
ReplyDeleteWhat a fun tutorial! Thanks for sharing! Owls are pretty much my favorite thing what with two little boys in my life. That fabric is the CUTEST!
ReplyDeleteI TOTALLY remember that Rice Krispies commercial!!
ReplyDeleteThose bags are adorable! Thanks for linking @'Sew Cute Tuesday'!
Super cute! Especially love the one with the blue owl fabric. I'll be having a go at one of these :)
ReplyDeletewww.sewrayme.co.uk
Hey, just wanted to let you know I featured your link today at SewHappyGeek's Feature Friday!
ReplyDeleteI love this bag. If you posted all the instructions online, why can't you post a link to print the instructions as I don't have a computer next to my sewing machine to follow the instructions. Just an idea!
ReplyDeleteThat is a fabulous tutorial. Thank you so much for sharing. Love the owl fabric. I'll be printing these instructions out and making a bag as soon as I find which safe place I have hidden my zips in! lol
ReplyDeleteGreat Tutorial
ReplyDeleteThank you ;)
This is great, I think even I could do the zipper here.
ReplyDeleteThank you.
I was one intimidated by Zippers too..then..I learned this technigue also ..and made the bags. They are soo much FUN once you learn how.
ReplyDeleteLove the CUTE fabrics you chose.
HOPE
nice tuto
ReplyDeleteThanks for sharing this little bag. I have made other bags using the same technique----different style. They would be a good item for the quilt show boutique. I'm off now to look and see what zippers I have on hand. Thanks again, it is a very good tutorial.
ReplyDeleteI fear zippers, but you made it look so easy. Thanks for sharing this tutorial I will be sewing my very first zipper this week.
ReplyDeletehttp://the-creative-raccoon.blogspot.com/
Thanks for this tutorial with the nice pictures. I am a beginner in sewing and tried today your zipper pouch. I was really easy and it costed me only about an hour. And the result looks perfect. I am very proud of my first zipper pouch! I think I will make more of these as Christmas presents.
ReplyDeleteolá, estou encantada com os seus trabalhos, são maravilhoso,muito lindo parabéns,
ReplyDeleteorigamidafatima.blogspot.com
Fantastic! And yes I remember the commercial - I loved it (it was my sister who at the time was the worst baker in the world yet everyone always raved about the simple things of rice krispie squares! - she is a great baker now though as she has learned to be with having 3 kids). This looks great as I need to make a whole heap of them in different sizes for back to school with all my fabric scraps. Never thought of cutting off the zipper so it lays nice and flat! Clever lady.
ReplyDeleteI just found this and I'm going to bookmark it! Thanks so much for the tutorial!
ReplyDeleteI followed this tutorial on Saturday and yippee for me...I no longer fear the zipper :-)!
ReplyDeleteThank you Obi Wan...you are the total bomb :-)!
Just finished my first one! It's adorable and easy and can't wait to make more. I'm making them for all of my nieces this year with their initial on the front and some nail polish inside! Thanks!!
ReplyDeleteAwesome tutorial! I've never tried a zipper before, but you made it look so easy - I'm inspired to try! THANK YOU!
ReplyDeleteCan't wait to make a 3 sided bag. Was afraid to break a needle.You've made it look easy. thanks The Duchess
ReplyDeleteThis is an incredible tutorial that I have shared on my website!
ReplyDeleteThank for putting it together.
Cheers,
Jessica
This is amazing! I am definitely going to try this with my new machine from Sewing Makes Me Happy and if it goes well, I might try to make a smaller one to use as a pencil case. Great tutorial, thank you for sharing!
ReplyDeleteHi Karen...great, easy tutorial. I did a practice run with the size you gave. Now I want to make more. More smaller ones and also some bigger ones. If I wanted to make one 15 x 15, is the 4 1/2" that gets cut off the bottom, a standard measurement? Or does it need to be adjusted for the size of the bag you are wanting to make? I hope my questions makes sense.
ReplyDeleteSew Much 2 Luv: Don'T Fear The Zipper...Bag Tutorial :) >>>>> Download Now
ReplyDelete>>>>> Download Full
Sew Much 2 Luv: Don'T Fear The Zipper...Bag Tutorial :) >>>>> Download LINK
>>>>> Download Now
Sew Much 2 Luv: Don'T Fear The Zipper...Bag Tutorial :) >>>>> Download Full
>>>>> Download LINK
Bursa
ReplyDeleteMersin
izmir
Rize
Antep
XK082N
van
ReplyDeletekastamonu
elazığ
tokat
sakarya
2NTGQ
ankara parça eşya taşıma
ReplyDeletetakipçi satın al
antalya rent a car
antalya rent a car
ankara parça eşya taşıma
2D14QA
ankara evden eve nakliyat
ReplyDeletemalatya evden eve nakliyat
antep evden eve nakliyat
giresun evden eve nakliyat
kayseri evden eve nakliyat
5H7
83831
ReplyDeletehttps://referanskodunedir.com.tr/
91658
ReplyDeleteParasız Görüntülü Sohbet
Twitch Takipçi Hilesi
Bitcoin Kazma Siteleri
Madencilik Nedir
Binance Ne Kadar Komisyon Alıyor
Facebook Grup Üyesi Satın Al
Tiktok Takipçi Satın Al
Bitcoin Çıkarma
Nonolive Takipçi Satın Al
8BBD3
ReplyDeleteBinance Referans Kodu
Caw Coin Hangi Borsada
Paribu Borsası Güvenilir mi
Binance Borsası Güvenilir mi
Azero Coin Hangi Borsada
Bitcoin Üretme Siteleri
Bitcoin Mining Nasıl Yapılır
Bitcoin Çıkarma Siteleri
Nonolive Takipçi Satın Al
DF35B
ReplyDeleteOkex Borsası Güvenilir mi
Youtube İzlenme Hilesi
Alya Coin Hangi Borsada
Dxy Coin Hangi Borsada
Kripto Para Kazma
Threads Beğeni Satın Al
Facebook Beğeni Satın Al
Sohbet
Görüntülü Sohbet Parasız
tgrdgyfrh
ReplyDeleteشركة صيانة افران بجدة
01B2A13FEC
ReplyDeletetiktok takipçi al
instagram beğeni satın al
düşmeyen takipçi
telafili takipçi
ucuz takipçi