Sunday, June 19, 2011

Traditions


It's funny how traditions get started. 3 years ago I made my hubby a fun Father's Day card with photos of him and our grandsons and it became his instant favorite. Seeing that today is Father's Day it's time to unveil the custom Father's Day card for 2011. He told me the other night that it's the thing he most looks forward to each year!.....no pressure...right?
He does sooo much for me every single day that it makes me happy if I can do something that makes him smile! This year's card is my version of an old John Wayne movie poster. The hubs is a huge fan of the Duke :) When I came across this poster, I knew it would be perfect. If you look closely you can see our 4 grandsons and our new little Sofia as well. He was so happy with it he had to show it at church this morning :)


This is the card that really started it all. I made this card in 2009 for Father's Day. At the time we had 3 grandsons. A lot has changed :) Since I had photos of each of them wearing helmets at different times I wanted to incorporate them into one card. I did a lot of paper piecing, cutting out their little bodies and cars. I used ribbon for the highway and brads for the hubcaps on the cars. This one still makes me laugh :)


Besides being a fan of the Duke, my darling hubby loves Star Trek. So last year I made him this card with our son and son-in-law together with my hubby on the front of the card and then my hubby with our 4 grandsons on the inside of the card. I make these cards by printing out the background pictures I find online and then going through my photo files and try to find pictures that will match up to replace the original actors. Then I cut them out and glue them in place. I know I can do it in Photoshop, but I love the look of layering real photos on top of these backdrops. The main thing is that my hubby really loves them and displays them in his office all year long. He asked me today to check into having them framed. That makes it all worth it. So I guess I've created a tradition in our household. I'm already thinking about what next year's card will look like :)


Also for the Dad's at church I made Caramel & Bacon Popcorn from a recipe I found at a cool blog called Zakka Life. You can get the recipe here. I don't know about the men around your home, but all you have to do around here is mention bacon and you have their attention!
I went to MarthaStewart.com and got these great free Father's Day printables to
finish off the project. All the Dad's were pretty excited to receive these today :)

Saturday, June 18, 2011

Friday Night Sew In Results & Giveaway Winners!

I did it! I started the baby quilt! When I looked at my kitchen table after squaring up my little diagonal pieces I just wanted to squeal! I just wanted to shout "Hey world! I'm a quilter....I quilt!" Ha!

And then when I got to actually make the pinwheels I was positively giddy! ( I loves me some pinwheels!!!)

And when I got to start adding the borders around the pinwheels, there was no stopping this quilting mama! That is, of course, until the hubs came in to tell me that their cigar night had come to an end a bit earlier than usual because he had to work today. Bummer times infinitiy! (as my friend Marcia likes to say)  So this is where I had to stop. I have lots to do today to get ready for Father's Day tomorrow so I dont' know if I'll have any time to work on it more today......but I can hope, right?
And now, without further ado,
the winners of the giveaway are -


Drum roll please......
The winner of the 15 dollar Hostess Apron from my etsy shop is:
Jennie!
The winner of the upcycled Tote Bag is:
Suburbsmama!

Congratulations Ladies!


Friday, June 17, 2011

I'm Divin' In!!!!


So tonight is the Friday Night Sew In over at Hand Made By Heidi. All you have to do to join in the fun is to pop on over to her blog and sign up and then post your pics to Flicker on Saturday to show what you worked on. She hosts this once a month and one random participant wins a fun prize.
 My buddy Regena won the first time we played along! (*sigh*....I wanted to win!)
I'm so excited to get started on my quilt! I have all my fabric cut and I'm ready to dive in!
So unless my daughter goes into labor tonight, I'll be sewing my very first baby size quilt! Woo Hoo!

Also.....don't forget that the apron and tote bag giveaway ends tonight. So if you haven't done it yet, you can click HERE and leave a comment for a chance to win!
 Somebody has to win....it might as well be you!

Also, also..... if I've never mentioned this before, my hubby and my son are both pastors at our church and our son preaches the 1st Sunday of every month. He is working on a new sermon series and would like to hear your questions about faith. You don't need to be a believer to ask questions.
If you have a moment, please hop on over to his blog  Long Time Listener and post your questions by clicking on the "ask me anything" just underneath his profile.
Thanks everyone!

Thursday, June 16, 2011

Don't Fear the Zipper...Bag Tutorial :)


Does anyone remember the commercial for Rice Crispy Treats when the woman would throw flour on her face in the kitchen to make it look like she worked so hard to make them and then tell her family "Go ahead......eat them. I'll make more."? That's pretty much how I feel about these bags.
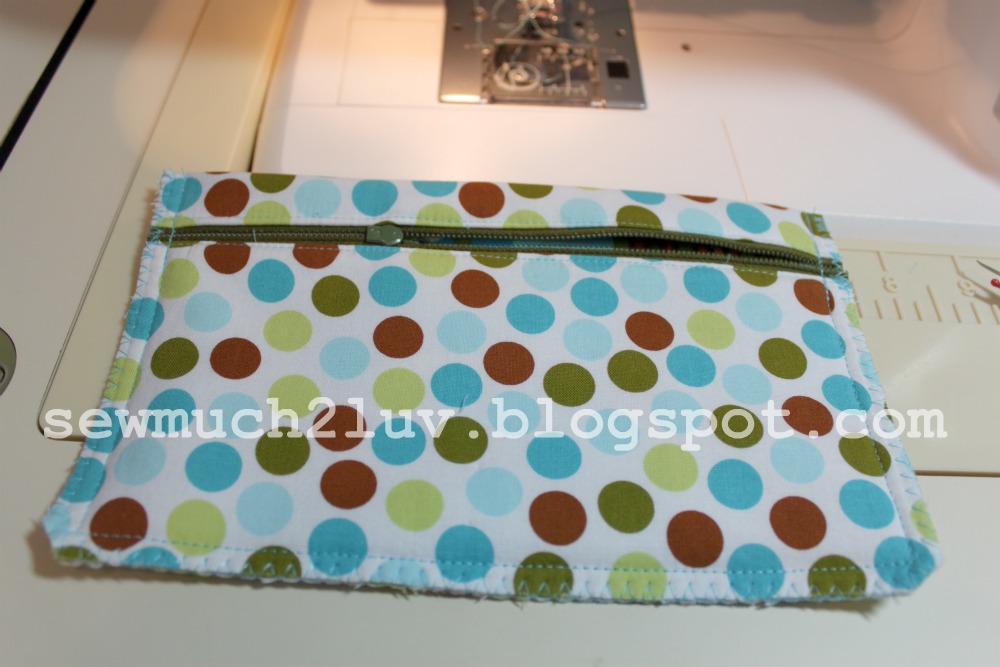
The finished bag looks like it was difficult to make, but really it's super easy!

A few of my girlfriends who are learning to sew are a bit intimidated by zippers.
One dear friend of mine actually used crazy glue to attach a zipper.
 (Don't worry...your secret is safe with me!:)
Well here is a project that makes sewing in a zipper Easy Peasy!
By using a zipper that is larger than the bag itself, it makes this bag totally stress free 
and there is no wrestling with the zipper.
This is such a breeze to do, you can even change the dimensions for any size bag, larger or smaller.
The finished size of this bag is 7 1/2" by 4 1/2".
 So are you ready to make a cute bag?

For this size bag you will need a zipper that is at least 12" long.
Cut 1 each of your main fabric, your lining fabric and fusible fleece into 8 1/2" by 11" rectangles. If you are using an obvious directional fabric like these owls, make sure to cut your fabric accordingly.

Next, iron your fusible fleece to the wrong side of  your lining fabric.

Layer your fabrics and make a cut at 4 1/2" from the bottom. You will have (2) pieces 4 1/2" by 8 1/2" and (2) pieces 6 1/2" by 8 1/2".


You can see by the photo that I am using a zipper that is quite a bit larger than the 8 1/2" fabric pieces. You can use any size you have laying around as long as it's larger that the bag you are making. Open your zipper and make sure it is face down on top of the 6 1/2"  main fabric with the zipper pull to the left.

Attach your zipper foot to your sewing machine. Sandwich the zipper between the main fabric and the lining fabric, right sides together. You can certainly use pins here to keep your pieces in place.

Using a pen or marker, make a mark where the fabric ends on both halves of the zipper. This will be a reference point.

Line up your 4 1/2" main fabric at the mark your made on the zipper so that both sides will line up and sandwich that side of the zipper the same way that you did the other with main fabric and lining fabric having right sides together.
This is what it should look like. Double check that you have the zipper face down at this point. ( Just the other day I ended up having to use the trusty seam ripper to re-do a bag because the zipper was wrong side up. )

Flip both pieces around so that wrong sides are together now and press from both sides being careful not to iron the zipper itself. You are trying to make sure that the fabric is away from the zipper teeth.


Still using your zipper foot, top stitch close to the edge of the fabric to insure that it won't get caught in the zipper when you open and close the bag later.

This is the time you would add any ribbons, ruffles, or appliques to the bottom section of the bag. Because this fabric has so much going on I chose not to add anything to distract from the owlies.

Open the zipper at least 1/2 way or more to enable you to flip the bag right side out after you sew the edges together. With the main fabric (right sides facing) pin the bag.


Using a 1/2" seam allowance stitch the 3 sides together making sure to stitch slowly through the zipper, using the forward and reverse stitching for re-enforcement. Dont' be afraid to sew through the zipper. Just go slowly and it works great.

Now you are ready to cut off the extra length of the zipper on both sides of the bag.

Trim your seam allowances and zig zag or overlock all 3 edges.

Turn the bag right side out and carefully push out the corners. Sit back and admire your work!
Easy right? So go ahead, give one to a friend.....you can make more :)

Wednesday, June 15, 2011

Too cute Tuesday!

Kristina asked me to make strap covers for her infant car seat to make it girly for little Evie. I bought this adorable flannel with the fairy princesses on it at Joann's to use for the burp cloths that I made and Kristina absolutely loved it! So she asked if I had enough fabric left to use it for this project.

These are super easy to make. Just cut 4 pieces of fabric 4 1/2" by 6" out of some kind of soft fabric. I used flannel and ironed fusible fleece to each of the 4 peices to add the squishy-ness (is that a word?) I used the end of a roll of thread and a disappearing ink pen to mark the rounded corners and cut them off. Then I placed 2 pieces wrong sides together and used my zig zag stitch around the edges to hold them together. I used double fold bias tape to edge them. Then I cut a strip of velcro and attached the hook and loop pieces to the short edges of the rectangle. It's like a potholder that you fold over and around the seat belt. Super easy and really cute!

Then I made a cosmetic bag and business card holder out of this wild fun fabric with pink polka dots for the lining.

With all the great fabrics available out there, it's just too easy to have a too cute Tuesday!

Monday, June 13, 2011

I didn't see that coming.....:)

 I'm always so overwhelmed when God showers blessings on  me.  One day last week a lovely woman from Texas bought 4 hostess aprons from my etsy shop. The next morning she contacted me and asked if I had any more. I emailed her pictures of my fabrics and she ordered 3 more. So I made the 3 she wanted plus a few more to list.  A day later she bought the other 4 that I had just listed! Yep....that's 11 aprons! I still can't believe it! At the moment I only have 3 listed so I need to get busy and re-stock before Friday so that my lucky winner will have a good selection to choose from.


(Don't forget to leave a comment on yesterday's blog post for a chance to win either an apron like these or the upcycled tote bag!)


So now I have cash in my paypal account. Oh what to do??? What to do???? 
Naturally I popped over to Joann's this morning and purchased a gathering foot for my machine that I have been wanting needing and picked up a cute bag pattern on sale ( cuz you can never have too many of those..right?). Then after watching my grandson's Hip Hop class performance it was back home for lunch and then off to M & L yardage where I spent 2 hours pushing my cart through the isles of yummy fabrics for some more aprons as well as a birthday giftie I was asked to make. I'm hoping that tomorrow will be a sewing filled afternoon!

Friday, June 10, 2011

200th Post Giveaway!

A few of the new hostess aprons I added to my etsy shop :)


June 14th 2010 I started this blog. I wanted to take part in apron swaps and I wanted to have a kind of journal of my daily nonsense that my grandchildren might be interested in one day.  I know I would have loved to have that kind of insight into my "Oma's" life.
Anyhowzers....Today is my 200th post. And imagine my amazement when I noticed that there were 98 followers when I went to bed on Tuesday night and when I woke up yesterday there were 106!!! I can't tell you how honored I am that you take the time to read my blog and leave me such lovely comments!
Since June of last year a lot has changed in my life.
 We went from an "all boy" grandchild situation to the joy of welcoming 2 baby girls into our family!
 I've met some wonderful blogger buddies that I know will be my lifelong friends, that have me laughing out loud ( and sometimes even shooting coffee out of my nose!) as well as being such an amazing support group when I've really needed it!
 I've opened my etsy shop in January and it's just now starting to take off :)
I've learned so much and find so much inspiration in reading all the other wonderful crafty blogs out there!
So you're probably thinking...."yeah, that's great.....but what is the giveaway?"
OK....so here it is:
Since this is my 200th post, there will be 2 winners!

One lucky blogger will win this fun upcycled tote bag!
(You can see more about this tote bag here)


And the 2nd lucky winner will get to choose one of my $15.00 hostess aprons from my etsy shop!

To enter this giveaway you'll need to leave me a comment and tell me what kind of things you'd be likely to purchase this year from etsy as gifts or for yourself, if anything.
 It doesn't have to be something from my shop. 
You only need to comment once.
That's it. Easy Peasy :)
 You'll have until Friday June 17th to enter. I'll choose the winners at random and announce them on Saturday June 18th. If you are a no-reply blogger, please leave your email in your comments so that I have a way to contact you if you win.
NOTE: If my daughter goes into labor (she's due the 20th, so it could happen) I may not be able to post the winners on the 18th. So if you don't hear from me, just know that I'll post as soon as possible afterwards.


Good luck!